


|
Tips and Tricks for Installing Cut Vinyl Vehicle Graphics.
Proper Cleaning – an Important First Step Begin cleaning by removing all dirt and grime with a commercial detergent solution and water. (Note: If you take the vehicle to the car wash for this portion of the cleaning, it is important to make sure the vehicle is completely dry before applying the graphics; this may mean allowing the vehicle to sit indoors overnight.) If grease, oil, wax or other contaminates are present, wipe the substrate with a solvent like Prep-Sol or Xylol. I then like to do a final cleaning with isopropyl alcohol (IPA) to make sure that no oily residue from the other solvents is being left behind. A word of caution though: Before using any solvent on a vehicle, test it in an inconspicuous area to ensure the solvent won’t harm the vehicle’s paint. Measure Twice, Apply Once Tools and Techniques for a Seamless (and Bubble less) Application Vinyl manufacturers typically recommend application in temperatures of 50º to 90º F, with 70° to 80°F being the optimum range. Whenever possible, apply graphics indoors in a controlled environment, which will help control temperatures as well as reduce the amount of wind and dust you have to deal with. The room and substrate temperature can greatly impact your application. A high temperature will make the film softer and more pliable. The higher temperatures will also make the adhesive more aggressive, which can lead to per-tack and increased stretching if you try to reposition the film. Lower temperatures will make the film more rigid and reduce the tack of the adhesive. Applying in either of these extremes can make your application more difficult. There are a few basic tools you will need to apply graphics. They are:
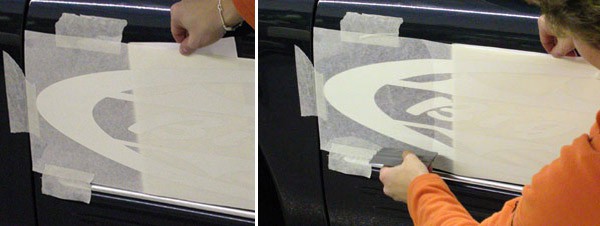
At this point you should have decided on your approach to applying the vinyl. If possible, remove the liner (backing paper) a little at a time to prevent the adhesive from prematurely adhering to the substrate. In this first example, I used a top hinge and pulled the liner down a little at a time. First, I removed approximately six inches of the liner. I also kept tension in the film by holding the bottom edge of the graphic. This tension on the film will help prevent the graphic from touching the vehicle before you squeegee it into place. As I squeegeed the graphic down, I positioned the squeegee so that the air pushed down and out, and I also made sure that I overlapped the squeegee strokes. Both of these steps helped to avoid air bubbles The second graphic was a bit more challenging, since it stretched almost the entire length of the vehicle. One of my primary concerns with this graphic was to keep it parallel to the body molding I used as my guide. Instead of using the top hinge method, I chose to use an end hinge by sliding back the liner a little at a time underneath the positioned graphic. By using this method I did not lose my placement of the graphic. The method for squeegeeing the graphic is similar to above; we want to be sure the air is being pushed away from the portion of the graphic that has already been applied, and we want to overlap the squeegee strokes. Since this second graphic runs the length of the vehicle, the graphic must be applied over the gap between the front and rear doors. As you squeegee the graphic into place, ignore the seam for now. After the entire graphic is applied, you can go back and trim the graphic. In this situation I prefer to cut the film flush with the edges of the front and back door, which requires two cuts
|
|


|
|
|


Making the Cut
The steps discussed here are for the dry application method, which is recommended by most material manufacturers. While the dry application method does require more skill and experience, you will find that once you learn how to apply using this method you will reduce your application time. When applying dry there is no need to allow the adhesion of the graphic to build for several minutes, or in some cases hours, before removing the application tape, and you eliminate the mess of using wet application. It is also important to note that the new channeled adhesive technologies from Avery Dennison and 3M are very helpful in reducing or eliminating air bubbles in the application process.
Using these tools and techniques, your cut vinyl vehicle graphic installations should be fast, easy and trouble-free


